如果你还犯愁,如何在内网搭建DNS服务器,那么请看看这里吧。
当前主机是否已经启用53端口? 如果你不清楚53端口的功能,请查看下/etc/services文件,它会告诉你答案。
为了顺利进行下一步,需要确保你的机器上没有开启53端口,也就是说你的主机不是一个DNS Server。
如何确定呢?当然要使用netstat命令来查看端口,当然配合lsof命令也许会更明确。
比如笔者本机就是这样的:
1
2
3
4
5
6
7
8
9
10
11
12
prexer $ netstat -ntulp | grep 53 (Not all processes could be identified, non-owned process info will not be shown, you would have to be root to see it all.) tcp 0 0 127.0.0.53:53 0.0.0.0:* LISTEN - udp 0 0 127.0.0.53:53 0.0.0.0:* - udp 0 0 0.0.0.0:5353 0.0.0.0:* - udp6 0 0 :::5353 :::* - prexer $ sudo lsof -i:53 COMMAND PID USER FD TYPE DEVICE SIZE/OFF NODE NAME systemd-r 778 systemd-resolve 12u IPv4 20918 0t0 UDP localhost:domain systemd-r 778 systemd-resolve 13u IPv4 20919 0t0 TCP localhost:domain (LISTEN)
如果找到了端口占用,只要关闭指定的程序即可,简单来说就是这样:
1
2
3
prexer $ sudo systemctl stop systemd-resolve # 或者 prexer $ sudo kill your_pid
用什么来构建DNS服务器呢? 当然是大名鼎鼎的DNSmasq了,如果你不了解,您这边请: http://www.thekelleys.org.uk/dnsmasq/doc.html。
这个项目是有命令行支持的,参考官网也可以很容易构建出来,不过本文打算使用更简单的docker容器来完成这件事。
说到这里,请注意,本文并没有直接使用官方提供的docker镜像,而是使用了另一个拥有web支持的docker镜像。
构建一个符合你胃口的DNSmasq的配置文件 对于配置docker镜像而言,配置文件肯定是逃不了的,你可以先看看官方的配置文档 ,了解有什么后,再动手也不迟。
这里我们介绍一个通用且简单的配置,当你学完后可以自己进行修改,多开心。
配置文件及解释如下:(将这个文件保存为:dnsmasq.conf文件,存储在你当前的工作目录或者任意可指定的目录即可)
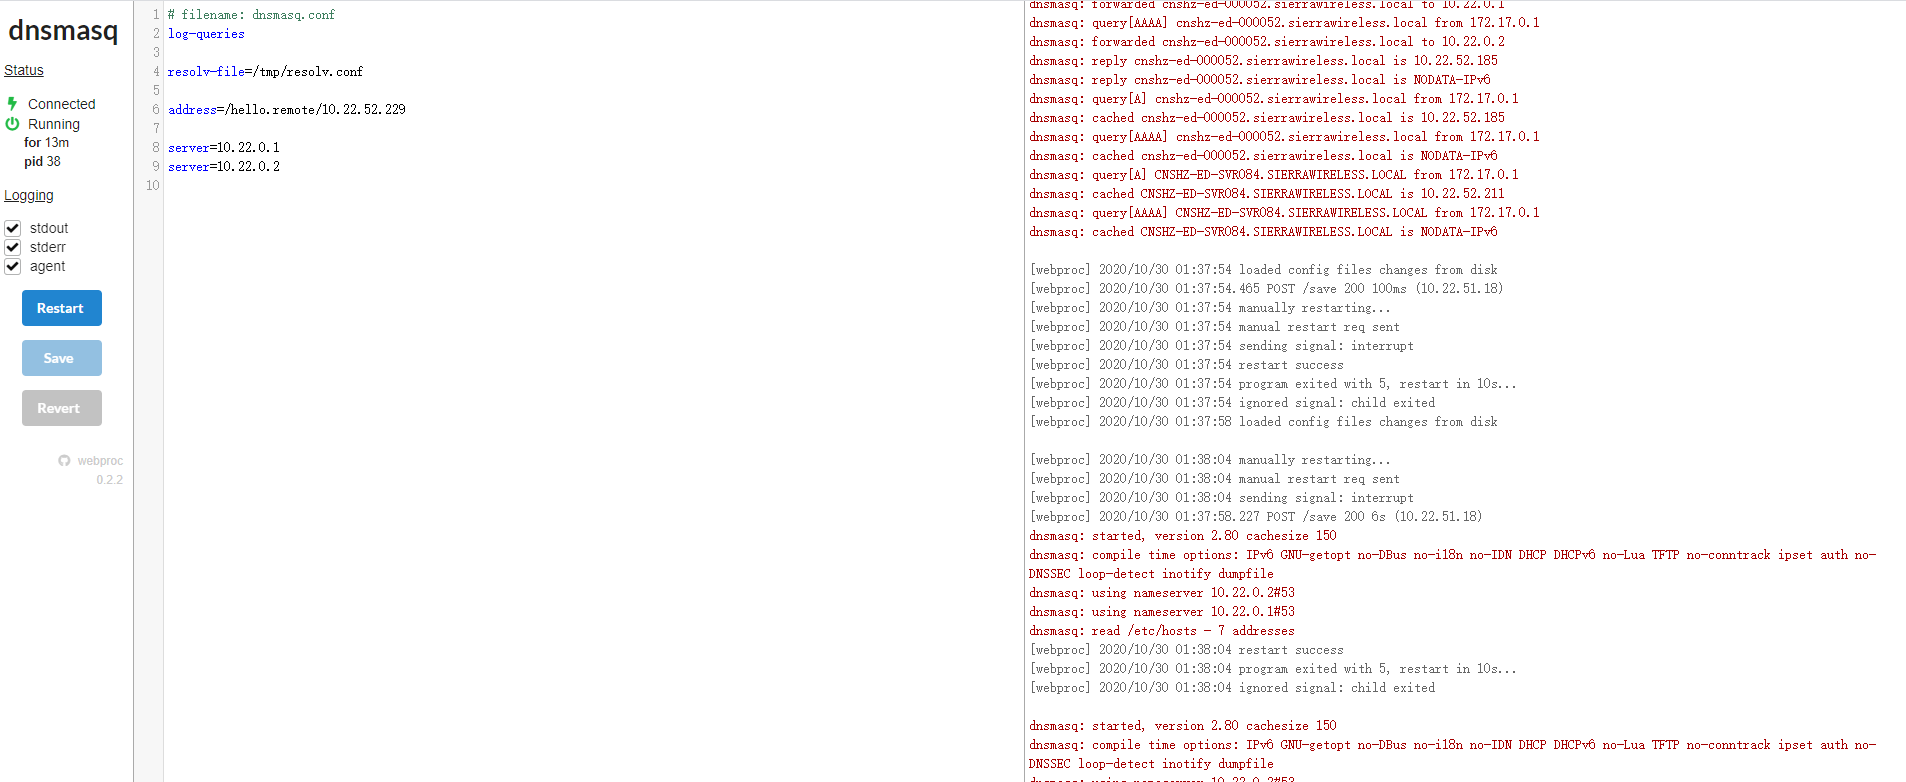
1
2
3
4
5
6
7
8
9
10
11
12
13
14
15
# filename: dnsmasq.conf # 需要存储log,后续再命令行中指定log的限制大小 log-queries # 指定一个自定义的解析文件,它可以保证你不用修改原始的配置文件/etc/resolv.conf resolv-file=/tmp/resolv.conf # 一个测试的名字,IP地址是内部网络的另一台主机,通过这个名字来完成后续的验证 address=/hello.remote/10.22.52.229 # upstream nameserver,也就是找不到靠上游的道理 # server=/localnet/127.0.0.1 # 不加也可以,添加非公开的内网DNS,就像联机打游戏一样 server=10.22.0.1 server=10.22.0.2
复制一份解析文件:
1 prexer $ sudo cp /etc/resolv.conf /tmp/resolv.conf
到了这里,基本的配置就算完成了,很简单吧,之后我们开始启动DNSmasq容器。
开始构建激动人心的docker容器 众所周知,容器的使用是廉价的,所以你几乎不用知道细节就可以搭建一个完美的沙盒环境(一点不知道也不行哈…)。按照官方文档的指示,你当然可以修改docker启动的参数,然后鼓捣鼓捣自己的配置,反正玩不坏,尽情尝试。不过为了教学,请看看我的例子:
1
2
3
4
5
6
7
8
9
10
11
docker run -d\ --name dnsmasq \ --rm \ -p 53:53/udp \ -p 53:53/tcp \ -p 8080:8080 \ -v `pwd`/dnsmasq.conf:/etc/dnsmasq.conf \ --log-opt "max-size=100m" \ -e "HTTP_USER=root" \ -e "HTTP_PASS=root" \ jpillora/dnsmasq
一些简单的参数解释:
1
2
3
4
5
6
7
8
9
10
11
docker run -d\ # 以守护进程的方式运行容器 --name dnsmasq \ # 容器的名字 --rm \ # 用完后删除,即你stop的时候就会删除哦 -p 53:53/udp \ # 暴露容器的53端口和宿主机关联,udp/tcp协议如果你不懂,简单百科一下 -p 53:53/tcp \ -p 8080:8080 \ # 暴露容器的web端口,便于后续再网页上查看和配置 -v `pwd`/dnsmasq.conf:/etc/dnsmasq.conf \ # 重点,配置文件的关联,这个逻辑卷的知识你可以自行科普 --log-opt "max-size=100m" \ # 限制输出的log文件的大小,很简单是吧,呼应前文 -e "HTTP_USER=root" \ # 登录web的用户名和密码 -e "HTTP_PASS=root" \ jpillora/dnsmasq # 包含web的基础dnsmasq镜像
查看启动状态,只是一些基础的docker指令:
1
2
3
4
5
6
7
8
9
10
11
12
13
# > docker ps -a |grep dnsmasq prexer $ docker ps -a|grep dnsmasq 6d75bfc34244 jpillora/dnsmasq "webproc --config /e…" 18 seconds ago Up 17 seconds 0.0.0.0:53->53/tcp, 0.0.0.0:8080->8080/tcp, 0.0.0.0:53->53/udp dnsmasq # > docker logs -f dnsmasq prexer $ docker logs -f dnsmasq [webproc] 2020/10/30 00:37:30 loaded config files changes from disk [webproc] 2020/10/30 00:37:30 agent listening on http://0.0.0.0:8080... dnsmasq: started, version 2.80 cachesize 150 dnsmasq: compile time options: IPv6 GNU-getopt no-DBus no-i18n no-IDN DHCP DHCPv6 no-Lua TFTP no-conntrack ipset auth no-DNSSEC loop-detect inotify dumpfile dnsmasq: using nameserver 10.22.0.2#53 dnsmasq: using nameserver 10.22.0.1#53 dnsmasq: read /etc/hosts - 7 addresses
至于是否启动成功,看看输出结果,对比对比就成了。
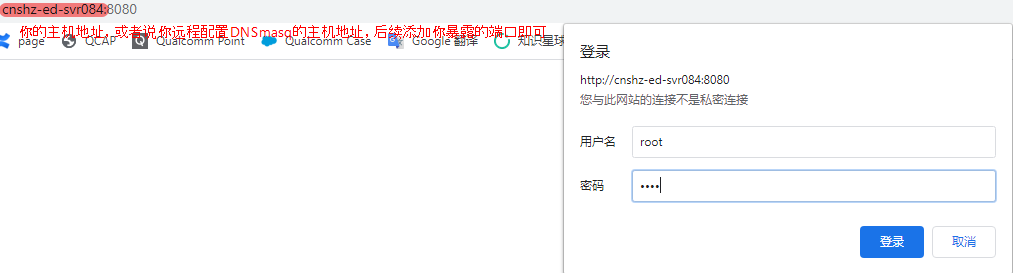
来吧,一起可视化查看与验证 从浏览器登录你已经配置的主机,方法如下:
1 在浏览器中输入:http://localhost:8080 或者 http://remote_ip_address:8080
这样就能到达登录界面,用户名和密码是之前命令行参数中配置的,请自行填写,效果如下:
登录后的界面如下:
在验证之前还需要一点知识要梳理:
首先,之前复制的DNS解析文件/tmp/resolv.conf是配置的DNSmasq解析的上游服务文件,具体请看下面的解释:
1
2
3
# Change this line if you want dns to get its upstream servers from # somewhere other that /etc/resolv.conf #resolv-file=
很多同学在里面配置了nameserver 127.0.0.1本地的地址,想要使用本地的docker DNS服务,其实还不行,需要你真正配置本机的DNS解析文件才可以,也就是修改/etc/resolv.conf添加如下信息:
到这里基本上可以进行下一步了。
那么我们验证一下配置的结果吧:
首先用你们最熟悉的ping指令,走个ICMP协议看看:
1
2
3
4
5
6
7
8
9
prexer $ ping hello.remote -c 3 PING hello.remote (10.22.52.229) 56(84) bytes of data. 64 bytes from CNSHZ-ED-SVR097.sierrawireless.local (10.22.52.229): icmp_seq=1 ttl=64 time=0.190 ms 64 bytes from CNSHZ-ED-SVR097.sierrawireless.local (10.22.52.229): icmp_seq=2 ttl=64 time=0.257 ms 64 bytes from CNSHZ-ED-SVR097.sierrawireless.local (10.22.52.229): icmp_seq=3 ttl=64 time=0.230 ms --- hello.remote ping statistics --- 3 packets transmitted, 3 received, 0% packet loss, time 1998ms rtt min/avg/max/mdev = 0.190/0.225/0.257/0.032 ms
在来看看主机的IP地址映射关系,当然要用host指令:
1
2
prexer $ host hello.remote hello.remote has address 10.22.52.229
其他的协议不用一一验证了,应为这是标准的端口,也是通用的tcp/udp协议簇,如果你还好奇,可以验证ssh或者dig之类的指令玩玩。
内网其他主机如何使用你的DNS服务器? 本机用当然还不够,要内网其他同事能够使用才行,其实用起来依旧很简单,就是在内网的任意机器上(可达你的主机),修改/etc/resolv.conf文件,添加一行:
1 nameserver <your_dns_server_ip_address>
<your_dns_server_ip_address>这个替换你的主机IP就可以了。
赶快用起来!^_^